Instructions on how to create an event and an explanation of all the settings and options.
EnrolHQ's ability to set up and run events
EnrolHQ comes with the ability to set up and run events for future students and their families. Your school might have ‘Open Days’, regular ‘School Tours’ or even ‘Taster Days’ for Kindergarten students.
Schools will commonly have prominent ‘calls-to-action’ on their websites to “Book A Tour” and you can change these to point directly to your EnrolHQ Events page.
Marketing teams will often run campaigns on social media and banner/print ads in the local area and these can have links that point to your events page which will be located at https://enquiry.school.wa.edu.au/events/.
It’s important to capture future parents information including their email and phone and what year/year level-of-entry their child is expected to attend your school. By capturing this data you will be able to communicate with the parents at the right time to enrol their students.
Create a new event
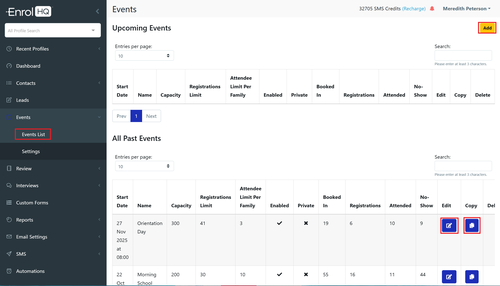
To create a new Event, go to Events and click ‘Add New’ at the top, to Edit an existing event click the Edit Icon on the far-right column of the event you want to edit. You can also copy a previous event by using the copy button.
For each event you will need to add the following details:
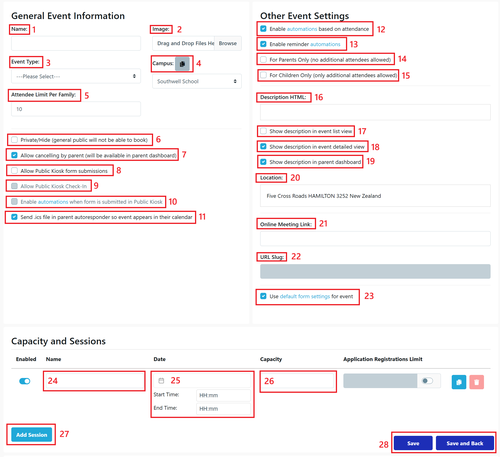
- Name: What is shown on the event page for parents to select
- Image: Optional but can reflect the type of event
- Event Type: This is the category of event. The category is important because it can be used to change the text in email confirmations and the reminders Note: that the Event Type list can be set in Events > Settings
- Campus: When you have a multi campus school you can select the campus the event is related to. Main Campus is the default.
- Attendee limit Per Family: You can restrict the number of people from each family. Default is 10.
- Private/Hide: if selected the event is not available to be booked. You can choose to ‘Hide’ an event if you don’t want it published yet.
- Allow Cancelling by Parent: You can set this default in settings. Default is on.
- Allow Public Kiosk Submissions: Allows attendees to register via the QR code.
- Allow Public Kiosk Check In: Allows attendees to check-in via the QR code.
- Enable Automation when form submitted via Kiosk: Sends a response to the parent to confirm attendance if setup.
- Send .ics file to parent: this allows attendees to add the reminder to their personal calendar. This will put the event details into the user's calendar automatically as soon as they open the autoresponse email - a very handy tool.
- Enable automation based on attendance: sends responses based on attendance marked on the event
- Enable reminder automations: send a reminder email or SMS depending on the individual school setup.
- For Parents Only: allows only parents to book for the event
- For Children Only: allows only children to be booked in
- Description HTML: The text box gives you a place to enter a short description of the event. This will display on the booking page and can also be sent to the parent in the email autoresponse or reminder.
- Show Description in event list view: view option based on the type of link used for your website
- Show description in event detail view: view option based on the type of link used for your website
- Show description in parent dashboard: shows all detils not just date and time of event.
- Location: can be updated. Pre-Filled with the default campus address.
- The Online Meeting link is a place to assign your Teams, Zoom, Youtube or other meeting link if that is setup before the date. This will allow you to email it to the registrant in the autoresponder and reminder emails - and it will appear in the ical link in the parent's calendar. If your meeting link is too long please use this article to reduce the length Online Meeting Teams link too long
- URL SLug: this is generated automatically when you cret a new event. Note: when copying an event this must be changed manually to reflect the new date of the Event.
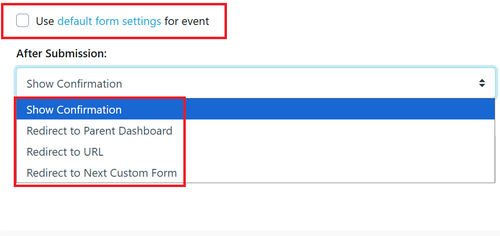
- Use Default Form Setting for Event: On each event there is an option to change the redirect the default is on with a tick. When you untick you can have different confirmation details
- Capacity and Sessions - Session Name: this name is used in automations and email tags
- Date Start Time, End Time: Mandatory and must be in the future.
- Capacity: This is the absolute number of people allowed at your tour. You can also set the number of Registrations (or groups) of attendees and set the maximum number of attendees per group. Whatever limit is reached first will hide the event from the /events overview page and also disable the booking page. You can edit the message that appears on this fully booked page under Settings > Customisation.
- Add Session: you can add more than one session for a tour type however please keep in mind that reporting on tours is Event based and not Session based.
- Save or Save and Back: Once you’re done, to make sure any edits are saved and published.
This image is related to #23
Once you've saved the event you can go back out to the Event list view and you'll see the new event that's available there. Click Edit to access the URLs
There might be more URL's if you use multiple sessions as each session will have a separate link to its own volunteer dashboard.
Web Links, Check-in and QR code Details for Individual Events
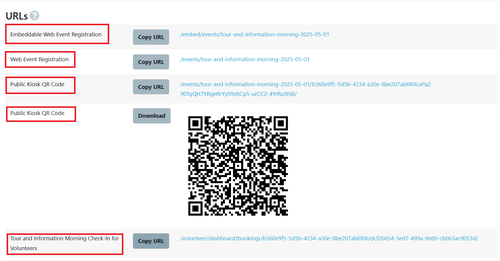
When editing the Event now, if you scroll to the bottom you'll see URLs and QR Codes and Volunteer check-in links. there is also optional area for Conversion tracking
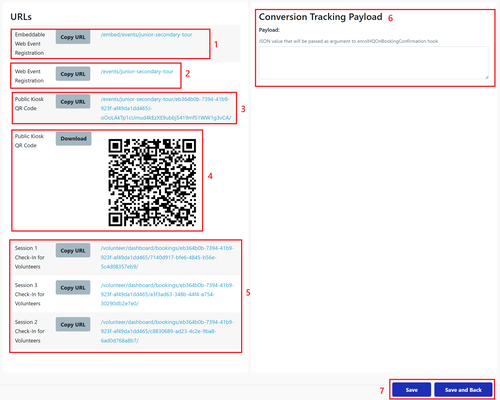
- Embeddable Web Event Registration - This is the link you need to use if you want to embed this specific event on you website.
- Web Event Registration - this is the URL that you need to copy to send via email if your event is private. You can paste this event to Social Media campaigns too to have parents click directly through directly to a booking page.
- Public Kiosk QR Code URL - this is the URL to be provided to IT. It's a version of the Event Registration Form for parents that automatically goes back to the beginning again after a parent has filled it in. This is useful for collecting registrations on the day of the School Tour or Open Day if parents haven't pre-registered or RSVP'd beforehand.
- Public Kiosk QR Code Download - this is the file to print for parents to check in via scanning as per step 3.
- Check-In For Volunteers - this is the URL that is required to be copied to an iPad that will be used to mark attendance for families as they arrive at the event. If you click on the link itself it will take you to a page where all the families are listed by the students' names and you can click each one to mark attendance.
- Conversion Tracking Payload - this is where you can add JSON value that will be padded into the enrolHQOnBookingConfirmation hook
Embeddable Links for all Events
Depending on how you wish to add your events to your website there are different links created within EnrolHQ for you to use.
There is the link found on the Main Menu called Parent Links which displays all the links available including Events
Alternately there is an embedded code that can be used
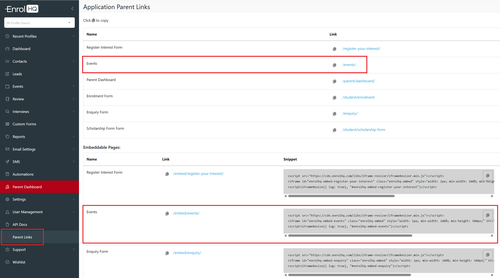
This is a sample of how a Code is copied and can be altered to suit:
<script src="https://cdn.enrolhq.com/libs/iframe-resizer/iframeResizer.min.js"></script>
<iframe id="enrolhq-embed-events" class="enrolhq-embed" style="width: 1px; min-width: 100%; min-height: 500px;" src="https://testing.enrolhq.com.au/embed/events/" frameborder="0"></iframe>
<script>iFrameResize({ log: true}, "#enrolhq-embed-events")</script>
Note: the size of the iframe can be adjusted here by altering the min-height
Ensure you have setup the reminders required for each event type