EnrolHQ Masterclass

Student Profiles

This section details how to work with an individual Student Profile. Every family that enters in a child with a DOB, Year of Entry and Calendar Year of entry automatically creates an EnrolHQ Student Profile and this record is added to and updated as the family progresses from enquiry to orientation.

Header graphic showing feature

The Basics

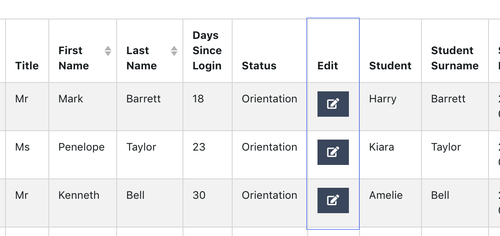
To view an individual student profile there is a small blue ‘Edit’ button for each record in the table. This will take you the student profile detailed view with all the information and tools you need for managing a future student.

Edit Button on EnrolHQ CRM

The important thing to note about EnrolHQ is that every parent who fills out a form will have a student profile created and from there, subsequent forms that the parents fill out will keep adding to the profile that has been created. All the data is in one place and keeps getting updated.

Adding a New Student Profile

Most of your Student Profiles will come from parents entering data via the EnrolHQ forms available. However sometimes you will need to create Student Profiles from scratch based on receiving an email enquiry or a phone call from a parent who isn’t already in the system.

To do this, click the ‘Add New Contact’ button at the top of the CRM.

Add New Contact Button

The minimum set of data you need to create a Student Profile is the following:

  1. Student First Name
  2. Student Last Name
  3. DOB
  4. Year Level of Entry (i.e Year 7)
  5. Calendar Year of Entry (i.e 2022)
  6. Parents Title (Salutation)
  7. Parents’ First Name
  8. Parents’ Last Name
  9. Parents’ Email Address
Create a New Student Profile

This will create a student profile and assign a EnrolHQ Student ID e.g

20120808-7-2021-Chan-N

This Student ID is based on DOB-Year Level of Entry,-Calendar Year of Entry-Last Name-First Initial. If there are records where the details are exactly the same, then the subsequent records will have -1, -2 etc at the end of the Student ID.

Notes

Your CRM comes with the ability to add ‘Notes’ against any Student Profile. It records the date the note was made, the note itself and who wrote the note so you can build up a ‘case history’ for each family. These notes are never shown to the parents/student, they are meant for office staff use only and help you work as a team OR let you put notes to remind you about the history of a particular family.

EnrolHQ CRM Student Profile Notes

To see all the recent notes you have left against Student Records, you can go to Reports > Comments and that will list all the student records you have worked with and the most recent note left against that record.

Student Profile Tabs

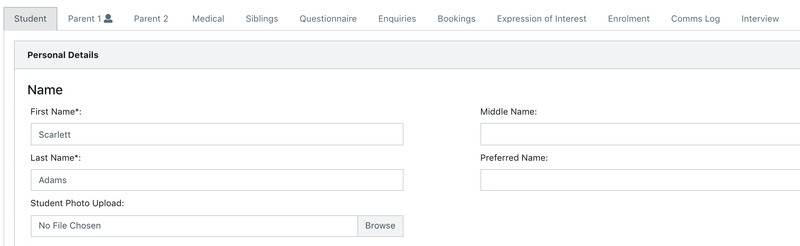
The tabs across the middle show you the different sections of the student profile you can access, they include (in order, from left to right):

Student Profile Tabs

  1. Student Profile - with personal details, citizenship details, residential details, learning abilities and further information and ‘How did you hear about us?’. Within each subsection, fields are shown for editing depending on your ‘Form Field Settings’. For example, some schools may choose to collect a student photo at Enrolment and this will be shown in the “Personal Details” tab.
  2. Parent 1 - all personal details for Parent 1 plus Contact Details, Religion/Nationality and MCEETYA data collection. If Parent 1 is an ex-student it will show at the bottom of this tab.
  3. Parent 2 - all personal details for Parent 2 plus Contact Details, Religion/Nationality and MCEETYA data collection. If Parent 2 is an ex-student it will show at the bottom of this tab.
  4. Medical - the Medical Tab will contain the future students Medicare details, Immunisation History Statement Upload, Doctor’s Details and Emergency Contacts
  5. Religion - if your school has enabled the ‘Religion’ block of the Enrolment form, then you will find Baptism/Parish related data in this tab.
  6. Siblings - if the parent has entered any Siblings (whether they attend your school or not), these will be found here
  7. Questionnaire - if your school has enabled the ‘Questionnaire’ part of the Enrolment form, then you will find the answers provided by the parents here for questions such as ‘Why do you want to enrol your child at our school/college?’
  8. Enquiries - if the parent has submitted an enquiry form (or multiple enquiry forms) the enquiries will be listed here.
  9. Bookings - if the parent has booked into a school event/tour, their bookings will be shown here including which event they've booked into, who the attendees will be. If you want to move a family from one event to the next because they can't make it, use the Event dropdown to choose the event they wish to book into and then save.
  10. Expression of Interest - if the parent has submitted an Expression of Interest form along with a payment the details of the submission will be shown in this tab. If your school has ‘Waitlist’ style forms going back in time, you can enter in a ‘Manual Waitlist Submission’ date which will help keep that student profile in its original priority queue.
  11. Enrolment - all the enrolment details and controls for managing an enrolment post form submission. This is explained in detail in the Enrolment Tab section
  12. Comms Log - this tab lists all the previous emails that have been sent by the EnrolHQ system to the future students family. It gives you a quick history of all interactions the parents have had with the school so far. You can also add manual entries to record any phone calls or emails that you send personally.
  13. Interview - this tab shows the school admissions interview related questions and any bookings the parents have for a school interview. It is explained in more detail in the Interviews section.

Primary Point of Contact Parent Controls

If you look at Parent 1 and Parent 2 tabs, you will notice a small ‘user’ icon next to one of them. This is the parent who filled out the form online and is the currently nominated ‘Primary Point of Contact’. What this means is that whenever the school requires the parent to log-in to their ‘Future Parent Portal’ to action an outstanding task, it will be this parent who logs in with their email address.

Parent Controls

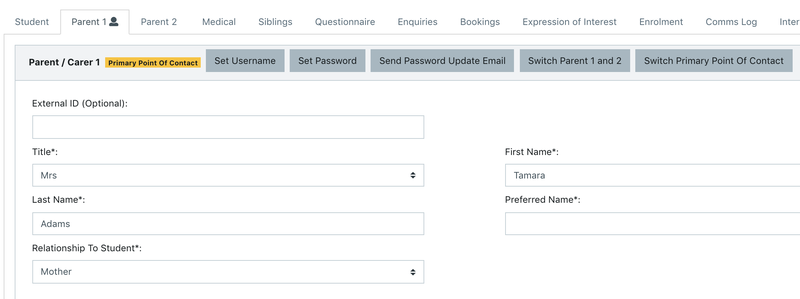
For the Primary Point of Contact, you are able to:

  1. Set Username - parents will be using their email address as their log-in for their parent dashboard. Sometimes you will receive communications from parents that they want to change their email address for their log-in. You can do this for them by using the ‘Set Username’ function. This will also change their contact email to match.
  2. Set Password - for parents who are unwilling to use the ‘Forgot My Password’ functionality when they can’t log-in, you have the ability to set a password for them. This is useful for those who are not technically savvy and/or are recent migrants with English as a second language
  3. Send Forgot Password Email - clicking this will send a standard ‘Forgot Password’ email which will send the parent a link to their email that they can click to enter a new password and log-in to their future parent dashboard again
  4. Switch Parent 1 and 2 - some schools are particular about having the father as Parent 1, and mother as Parent 2. If the mother has filled out the form and nominated herself as Parent 1, then you can switch the parents around to make her Parent 2 and her spouse Parent 1. She will still be the primary point of contact after the switch.
  5. Switch Primary Point of Contact - this is for the situation when Parent 1 has filled out a form initially but wishes for Parent 2 to be the admissions office ‘point-of-contact’ for that family going forward i.e the father filled out the form initially but wants the mother to ‘handle’ the rest of the enrolment. Switching the Primary Point of Contact will make the other parent the person who logs in with their email address to complete any outstanding tasks for Enrolment like re-uploading documents, booking an interview, ‘driving’ the acceptance of offer.