EnrolHQ Masterclass

CRM

The future students’ CRM is the heart of EnrolHQ. Every single form that’s filled out by a prospective parent whether it be ‘Register Your Interest’, ‘Enquiry’, ‘Event Booking’ or ‘Enrolment Form’ will create or update a future student profile in your CRM. This section shows you how to search for, filter student profiles and work with them in bulk.

Header graphic showing feature

CRM

Overview

You can reach your EnrolHQ CRM (Contact Relationship Management) by logging in to your staff dashboard and clicking on the Contacts > All on the main dashboard menu. The future students’ CRM is the heart of EnrolHQ. Every single form that’s filled out by a prospective parent whether it be ‘Register Your Interest’, ‘Enquiry’, ‘Event Booking’ or ‘Enrolment Form’ will create or update a future student profile (with parent details attached) in your CRM. It is the one place where you manage all of your future families’ to guide them through your schools’ full enrolment process.

EnrolHQ CRM

Enrolment Stages and Menu Shortcuts

On the main menu (left side) underneath the Contacts menu item, you will see that it expands out to have shortcuts to predefined filters. These are the different stages that student profiles are expected to go through as they progress through the enrolment process.

  1. All - includes all student profiles with the exception of ‘Declined’ and ‘Cancelled’.
  2. Register Your Interest - will filter for student profiles where parents have only entered their details via the ‘Register Your Interest’ form.
  3. Enquiries - will filter for student profiles where parents have filled out an ‘Enquiry Form’
  4. Bookings - will filter for student profiles where parents have made an event booking to a school event setup inside EnrolHQ
  5. Expressions of Interest - will filter for student profiles where parents have filled out an ‘Expression of Interest’ form
  6. Waitlist - As the name suggests - we help you prioritise the order of those waiting for a position.
  7. Enrolments - will filter for student profiles where parents have filled out an ‘Enrolment Application Form’
  8. Orientations - will filter for student profiles where parents have accepted an “Offer of Enrolment”
  9. Community - will filter for student profiles where the students are currently attending your school
  10. Alumni - will filter for student profiles where the students have graduated.
  11. Declined - will filter for student profiles where either the school or the parents have explicitly declined to continue with the enrolment at any point. They are placed here for record keeping and statistical purposes.
  12. Cancelled - will filter for student profiles that have been archived due to clerical errors such as being a duplicate record, spurious data being entered etc. Records are placed here so they do not affect record keeping and statistical purposes.

No student profile ever moves ‘backwards’ as they progress through their enrolment stages from Register Your Interest to Orientations. For example if a parent fills out an enrolment form and then books a school tour afterwards or posts an enquiry, they are still considered to be in the ‘Enrolments’ stage inside the CRM because that is the most advanced stage they have reached.

Top Level Filters

Top Level Filters

At the top level you have the following handy filters:

  • Status - this is exactly the same as the sidebar menu shortcuts however gives you the ability to drill down into the different stages of Enrolment including:
  1. Incomplete Application
  2. New Submission
  3. Enrolment Reviewed
  4. Principal Reviewed
  5. Offer Open
  6. Offer Expired
Status Filters

  • Year Dropdown which allows you to filter by the Year Level of Entry. Most schools will want to keep a close eye on Year 7 and Kindergarten/Prep/Reception Enrolments for a particular year
Year Dropdown

  • Year of Entry Dropdown which allows you to filter by the calendar year of entry. Most schools will want to know what their enrolment numbers look like 2 years out from the current year e.g if it is 2020, they will be looking at Year 7, 2022/2023.
Year of Entry Dropdown

There is also a search box which allows you to search the parents first name, last name, email address as well as students first name and last name.

CRM Search Bar

To clear all the choices you have made and go back to a blank slate for the filters, click the ‘Clear Filters’ button.


Advanced Filters

If you click on the ‘More Filters’ button you will see all the advanced filters that you can apply to filter your future student records. These are mainly based around actions that the parent has or has not completed.

More Filters

For example, if we want to find out all the parents who pre-registered for an event and then attended (or didn’t attend), you can pick the event from the ‘Registered For Event’ dropdown and then select ‘Yes’ or ‘No’ for the ‘Attended?’ dropdown.

There are advanced filters to find out if parents have:

  1. Started an Enrolment Form
  2. Submitted an Enrolment Form
  3. Been Offered an Enrolment
  4. Accepted the Offer of Enrolment (Ticked the Checkbox)
  5. Paid for the Acceptance of Offer
  6. Completed the Enrolment Process
  7. Have Offers of Enrolment before a certain date
  8. Have Offers of Enrolment expiring after a certain date
  9. Started an Expression of Interest
  10. Paid (Completed) an Expression of Interest form

By using any combination of these filters you can filter out for parents who need chasing up because they haven’t made payment for their offer of enrolment yet.

Record Listing and Bulk Actions

Once you have applied the correct filters or entered search terms, you will see the results of all the student profiles in a table view. You can choose whether you want to show 10,25,50 or 100 entries on one page of the table.

Show X Records Dropdown

If you scroll to the bottom, you will be able to go to the next page of results and see the total number of student profile results returned for your filter/search.

Pagination Controls for EnrolHQ CRM

In the top right hand corner of the screen, you will see a small spanner icon. Click on this and you will be able to choose which columns to show in your table.

EnrolHQ CRM Select Columns To Show

You will be able to check each column on/off including:

  1. Email
  2. Mobile
  3. Title
  4. First Name
  5. Last Name
  6. Days Since Login
  7. Status
  8. Student
  9. Student Surname
  10. Student DOB
  11. Year of Entry
  12. Grade
  13. Date Created
  14. Last Updated
  15. EOI Started
  16. EOI Submitted
  17. Enrolment Started
  18. Enrolment Submitted
  19. Enrolment Accepted

Some of these columns have a ‘up’ and ‘down’ arrow next to them, that indicates they are sortable in alphabetical or reverse alphabetical order. For date columns it sorts in forward or reverse order.

Sortable Columns

On the 2 leftmost columns you will see checkboxes and stars. The star functionality allows you to ‘star’ a student profile record to mark it as something you need to come back to later without having to leave a note on the record.

Star and Bulk Select

The checkbox allows you to select one or multiple records to apply a ‘Bulk Action’ to. To select all the records that match the filter/search you have applied, click the checkbox in the header (the top row) of the table and it will automatically check all records on the same page. If your filter/search returns multiple pages, it’s best to select a larger page size from the Show X Entries dropdown. Show 100 Entries will suffice. Then click the checkbox in the header row to select all records.

Screen Shot 2020-04-24 at 4.02.42 pm.png

The following Bulk Actions are available:

  1. Assign Interviewer
  2. Send Interview Invite Email
  3. Invite - this will send an email to invite parents to enrol their children. For example you may open Year 7 Enrolments for 2022 on a certain date, you would use this Bulk Action functionality to invite all qualifying parents in your CRM to enrol
  4. Make Offer - this will make an offer of enrolment to all qualifying parents. They will be sent an email asking them to log in to their future parent portal to accept the offer of enrolment.
  5. Change Status
  6. Archive - if you have student profile records that are duplicate or spurious, then you can use this bulk action to move them to the ‘Cancelled’ status.
  7. Send Email - this will allow you to send a bulk email to all selected parents. You can either write the email in the editor or select a pre-written custom template to send. Read more about sending emails in the ‘Email Templates and Sending Bulk Emails’ article.
  8. Add a Note
  9. Export CSV
  10. Book into an Event

Exporting Records

Aside from bulk actions, you also have the ability to export all the records that are returned with your search or specific records if you tick the checkboxes for certain records.

EnrolHQ Student Profiles are exported as CSV data so you can open the file in Microsoft Excel or similar to format the data for import into another system or work with the data as is.

Export Column Select

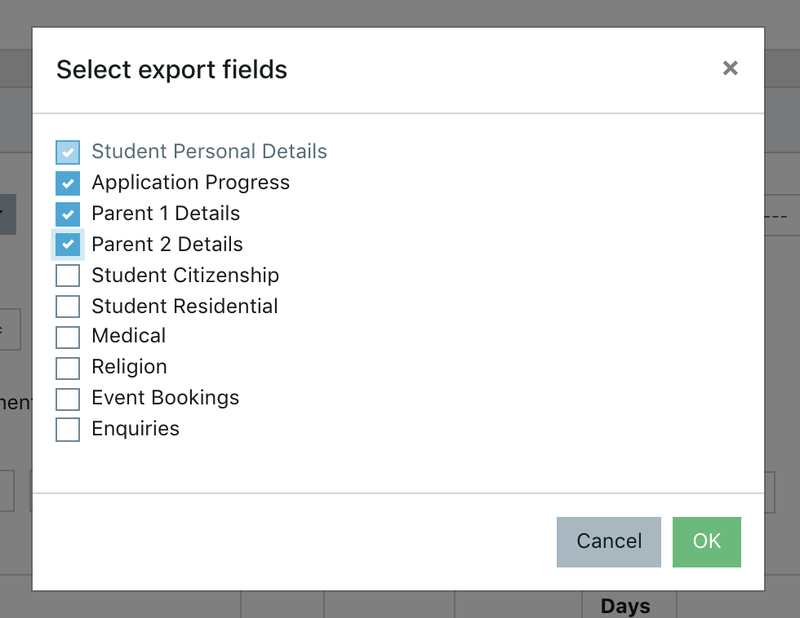
You have the choice to export the following data with each record by ticking the checkboxes when the ‘Select Export Fields’ window appears :

  1. Student Personal Details
  2. Application Progress
  3. Parent 1 Details
  4. Parent 2 Details
  5. Student Citizenship
  6. Student Residential
  7. Medical
  8. Religion
  9. Event Bookings
  10. Enquiries