
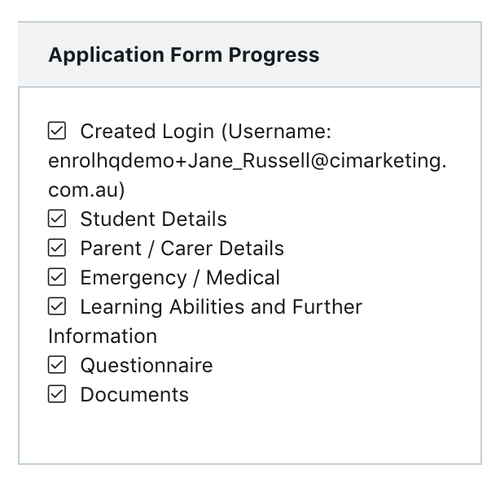
The tab that the admissions team will be spending most of their time in on a Student Profile will generally be the ‘Enrolment’ Tab. This is the ‘control panel’ for everything related to the enrolment. On the right side bar, there is a ‘Application Progress’ box to see how much of the form parents have completed. There is also an ‘Enrolment Progress’ box underneath to show much of the process parents have gone through.

In the main section you’ll have a ‘Enrolment Details’ section where you can see payments, print PDFs and make offers of enrolment. Below the ‘Enrolment Details’ section is the ‘Documents’ section which contains all the uploaded documents and the verification notes that have been entered.
This provides a quick overview of which sections the parents have completed in the Enrolment form. The Enrolment form doesn’t allow parents to skip through the steps on the first time they fill it out. The form will ask parents to fill out all mandatory fields or upload mandatory documents before allowing them to the next step. By seeing where they are at, you can choose to follow-up with parents (who are in the ‘incomplete application’ stage) who’ve reached the later stages of the form i.e “Document Uploads” or “Learning Abilities and Further Information”.
This provides a quick overview of how far the future student has reached in your schools enrolment process. EnrolHQ has an enrolment process where future families follow the following stages (it’s optional whether as to whether your school uses every single step):
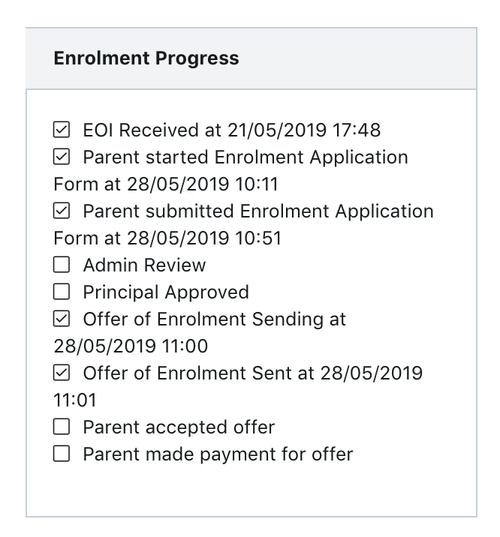
As each stage is ‘passed’, there will be a checkbox to mark complete and also the date (and time) it was completed.
This is the main section of the Enrolment tab with controls to help you review enrolments, make offers or decline enrolments.
The first field you will see gives you the ability to enter a ‘Manual Enrolment Submission Date’ - this is used by schools that are transitioning from paper based forms to EnrolHQ and have a portion of their enrolment applications for a particular year group submitted via the post. To preserve the original application dates for these paper application enrolments, use the ‘Manual Enrolment Submission Date’ fields which will override any online submission dates recorded in the system for this record. This will preserve the paper enrolments place in the priority queue.
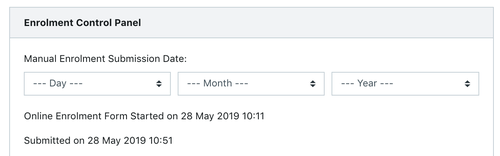
Next you will see the date and time the Online Enrolment form was started and following that, the date and time the form was submitted. For straightforward applications without questionnaires or complex document uploads, this will range from 30minutes to 1 hour. However some schools may ask ‘Questionnaire’ style questions and also ask for Clergy References to be uploaded so these forms will take a week to 2 weeks to be completed.
Next you will have a link to print the PDF form. The blue link prints only the answers provided by the parent as a PDF and nothing else. If you want to review the enrolment form in PDF format this is the link to use.
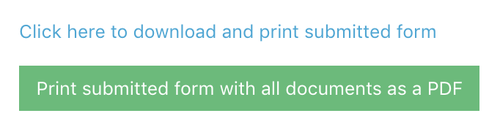
The green button labeled “Print submitted form with all documents” will print the enrolment form in PDF format but also append any document uploads the parent has made like birth certificates, passport, visa, immunisation history statement together.
This bundle keeps getting added to or revised as the parent moves through the process. For example if the parent was to re-upload documents, or accept an offer, then the PDF bundle that is downloaded is updated. Keep coming back to this green button to download the latest version of the ‘Enrolment PDF Bundle’.
Underneath the green button to print the PDF button there is a “Form is Correct” question. This is where you will review the answers provided by the parent to make sure the form has been filled correctly. Common mistakes include putting in the wrong DOB (doesn’t match what’s on the Birth Certificate), choosing the wrong calendar year of entry making the child too young or too old or filling out the MCEETYA data incorrectly.
If you see that the form has been filled out incorrectly, you can put a ‘No’ for the Form Is Correct question and a ‘Form Validation Note’ underneath that to explain which questions were filled out incorrectly. You can then come back to this enrolment student profile later after following up with the parent to get the correct answers to enter the correct details.
Marking a form as incorrectly filled out will also make the student profile show up with a red X in the ‘Form Correct’ column on the Enrolment review screen.
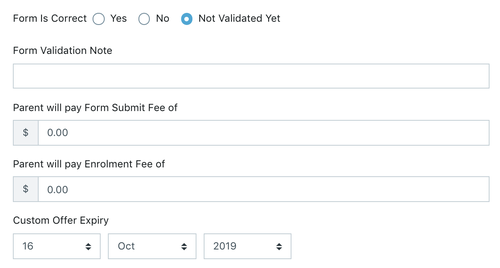
The next field “Parent will pay Form Submit Fee of” is used to enter a custom Enrolment Application Form Fee. There will be situations where parents may inadvertently make a payment directly to the school by going to the finance office in person, or finding another payment portal on the school website and making a payment there before they come to the online enrolment form. Sometimes you might waive the fee altogether because you’ve found out the parent is an ex-student. In these cases you could put $0 in the ‘Parent will pay Form Submit Fee’ field and it will waive the parent from making an online credit card payment for the enrolment application before submitting it.
The next 3 controls are:

These 3 controls are used to make an offer of enrolment to a family. Your school will have default offer expiry periods (2 weeks, 4 weeks) setup in the settings and also a default enrolment acceptance fee (anywhere from $1000 to $2500+). This means in 99% of cases, you can ignore the ‘Parent will pay Enrolment Fee’ box and the ‘Custom Offer Expiry’ date and just go on to click ‘Make Offer’
Clicking ‘Make Offer’ will preview the ‘Offer of Enrolment’ email before it is sent. At the top of the preview window you will be able to choose whether you want to send the offer email to the primary point of contact parent OR both parents. At the bottom, you click ‘Send’ and the offer of enrolment will be made by email to the family.
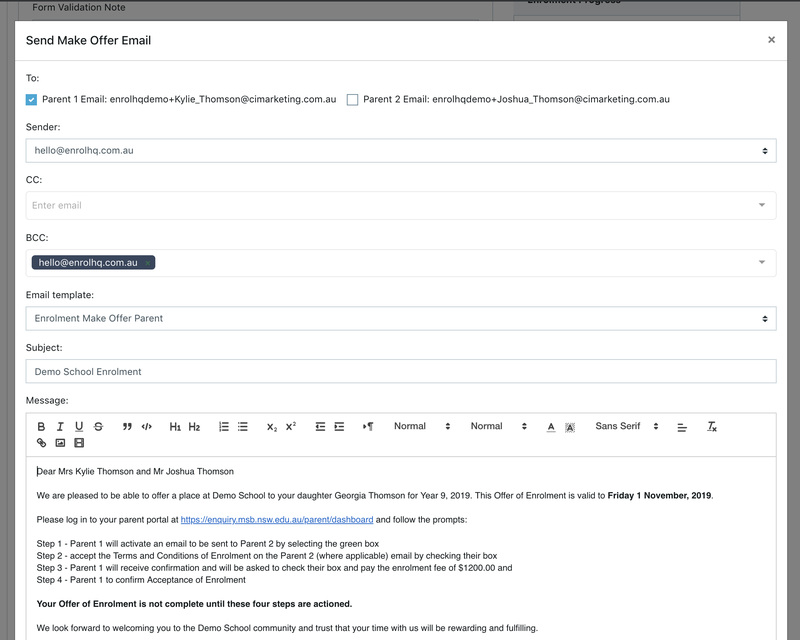
If you want to change the acceptance of offer fee, simply put the figure in the ‘Parent will pay Enrolment Fee’ of box. If you want to waive the acceptance of offer fee altogether (because the parent has paid by other means) then put $0 in this field and hit ‘Save’ before making the offer.
Sometimes you might want to bring in the Offer Expiry date, especially if the student is starting soon to fill a Year 8, 9, 10 or 11 position that’s opened up because another student has left. Put the custom date you want the offer to expire on in this field and click ‘Save’ before making the offer.
At any point through the Enrolments process, you may want to decline the family from enrolling i.e their offer has lapsed and they are not responding to follow-ups, they have siblings who are financially behind, or they have entered false information on their enrolment form. Then you can click ‘Decline by School’ to send an email to the family to tell them their enrolment has been declined by the school. You are able to choose to send no communications at all by unticking the ‘Send Email’ button in the ‘Decline By School’ modal window.
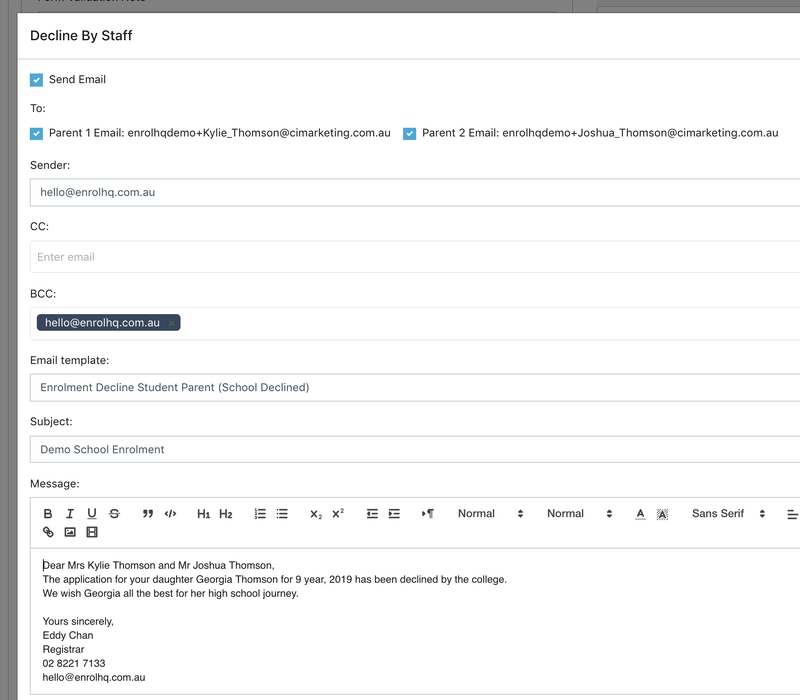
Declining the Student will move them in to the ‘School Declined’ status for record keeping purposes.
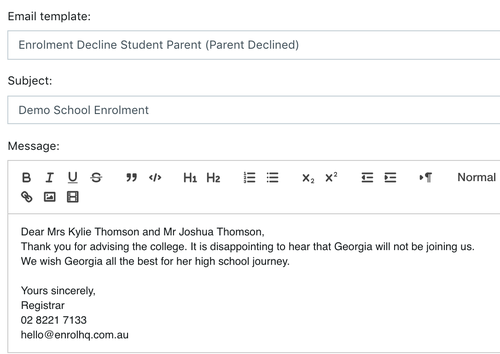
Parents may also expressly decline to continue with enrolling their child at your school i.e they might have accepted a place at another school. In this case you will click the ‘Decline by Parent’ button to send an email to the parent to wish them well and ask the family which school they have selected and why. This will move the student into the ‘Declined by Parents’ status for record keeping purposes.
Each enrolment offer needs to be accepted by both parents separately. EnrolHQ ensures this by not allowing Parent 1 to tick all the checkboxes for Parent 2 and then making payment. Parent 1 needs to click a button to send an email to Parent 2 to complete their acceptance first. Only after Parent 2 does their acceptance, can Parent 1 log-in and accept the offer then make the online credit card payment.
In rare cases, for example there is a court order saying that Parent 2 is not responsible for the childs school fees OR Parent 2 is deceased, then you will need to click ‘Waive Secondary Parent Acceptance’ - this will change the acceptance form so that it only requires Parent 1 to accept and pay the fees for the enrolment to be completed.

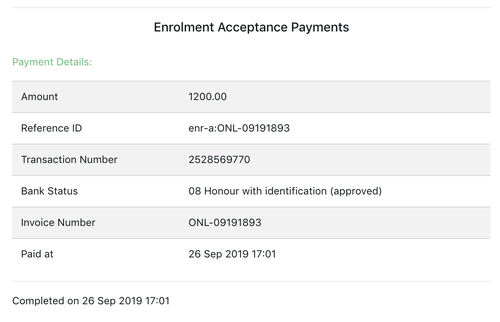
Finally there is Payment Records for the student record enrolment process. You will see payment details for the initial Enrolment Application Form and Enrolment Acceptance. For each payment EnrolHQ will record the following Payment Details:
This section allows you to review each document uploaded by the parents and verify whether it is correct or not. You can download each document individually including
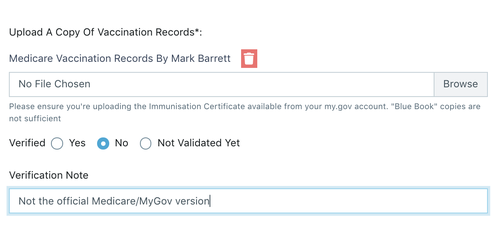
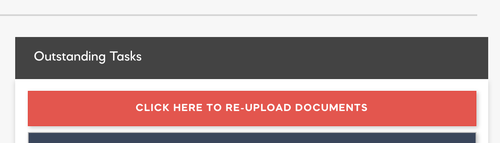
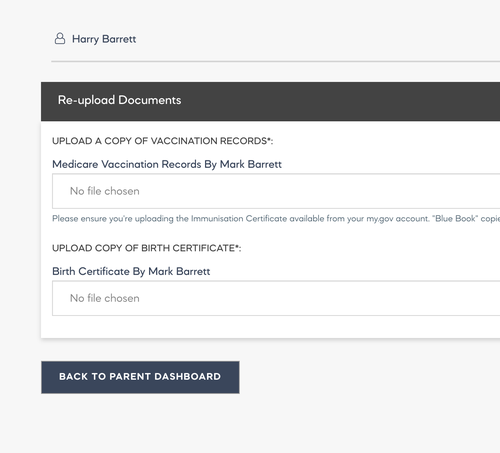
For each document you can use the controls underneath to say ‘Yes’ or ‘No’ to ‘Verified’ status. If ‘No’ you should leave a comment in the text box underneath to help you review any amendments the parents re-upload or send back to you via email. Some parents will email you new documents in which case you can re-upload them into the correct document ‘pigeonhole’ here. If documents are marked as ‘No’ for Verification these will show up as an Outstanding Task for Parents and they will need to log-in to their Parent Dashboard to re-upload a new scan of that document.
Clicking ‘Yes’ or ‘No’ to the document verification questions will also make them show up in the Reports > Admin Review screen as ticks and crosses so you can, at a glance see which of your enrolment applications needs attention when on that screen and who to follow-up to get them back on track.
