This feature is designed to simplify the process of collecting important information from various individuals. Please follow the steps below to make use of this feature effectively.
Additional Tips:
- Make sure to communicate clearly with the 3rd party recipients about the purpose of the form and the deadline for submission.
- Encourage 3rd parties to follow the provided link in the email invitation promptly.
- Provide any necessary guidance or support for the 3rd parties if they encounter difficulties while filling out the form or submitting documents.
- Regularly check the submission reports to ensure that you receive the required information from 3rd parties on time.
By following these steps, your school can easily enable and use the Custom Form Arbitrary Signing feature to collect information from various individuals, streamlining the data collection process and improving administrative efficiency. Customising the email template and setting up email notifications via automation allows for efficient communication and tracking of form submissions.
Customise Email Template
If you wish to customise the email template sent to 3rd party recipients, you can do so by going to Email Settings > Templates > Custom Form.
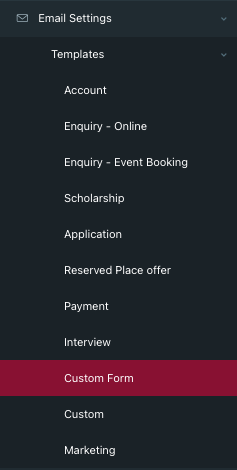
Inside the "Custom Form" template, you can make changes to the email content, including the Subject Line, Message Body, and any additional instructions you want to include.
Set Up Email Notifications Automation
To receive email notifications when a custom form has been submitted you need to create an automation. This is a 2-step process.
Create a custom email template that goes to school staff when a new form submission has been received
- Navigate to Email Settings > Templates > Custom
- Click “Add”
- Select type - custom
- Name your custom template
- Add a subject line
- Add your template
- Save
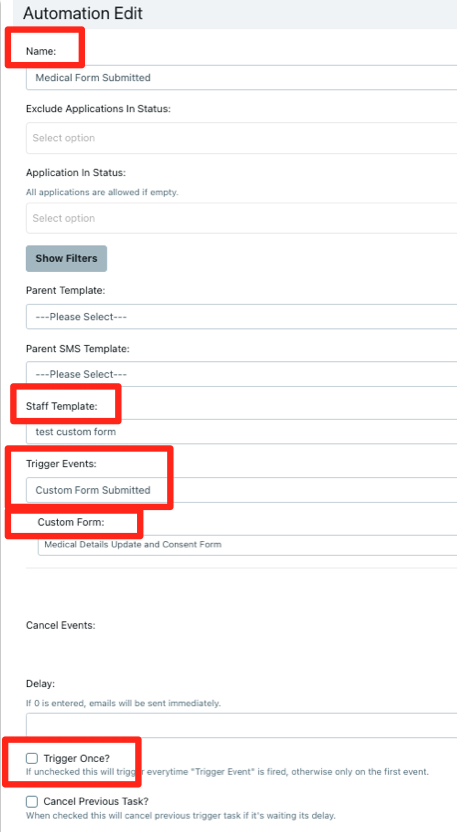
Create an automation
- Navigate to automations in the main menu
- Click “create”
- Add a name to your automation
- Under “staff template” select the custom email template that was just created
- Under “trigger events” select “custom form submitted”
- Select the correct custom form
- Untick the “trigger once” tickbox
- Save
Enable the Ability to Nominate 3rd Party Submission
Navigate to Custom Forms in the main menu > Find the respective custom form > Click “edit”
Enable “Ability to Nominate 3rd Party Submission”.
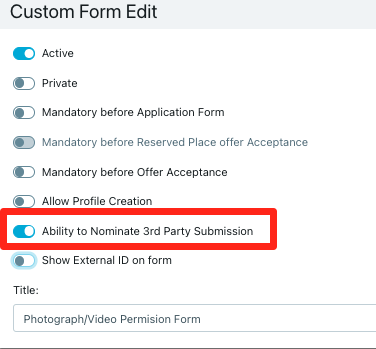
Make sure to save your changes if required.
Invite a 3rd Party to Fill Out a Custom Form
Navigate to the student detailed view section > Click on the "Custom Forms Invites" tab > Click “add”

Select and Nominate Access
In the Custom Form Invite section, you will see a list of available custom forms. Select the specific form you want to send to a 3rd party.
Next, you will need to nominate who should have access to this form. Fill in the information about the person who will receive this form.
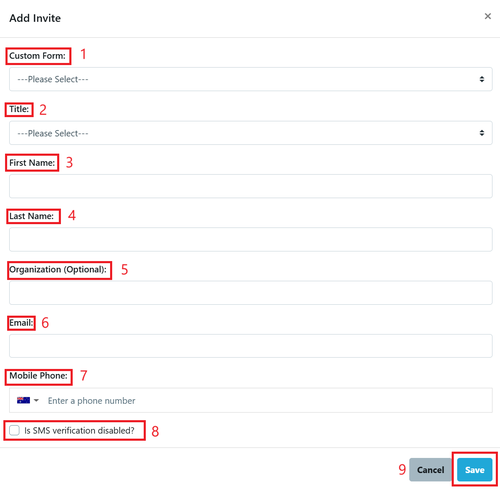
1 Select the custom form you are sending to the recipient.
2 Recipient Title
3 Recipient First Name
4 Recipient Surname
5 Recipient Organisation (optional)
6 Recipient email address (mandatory)
7 Recipient mobile phone number if provided
8 Select if no mobile number is provided
9 Save this will take you back to the Custom Form Invite Page

Select the link to send the email - the Template will preview

Customise the message prior to sending the invitation to the recipient.
Track Custom Form Submissions
To track submissions from 3rd parties, go to Reports > Custom Form Submits.
Within this section, you should be able to filter on different custom forms and view a list of submissions, including the ones initiated by 3rd parties.