Using a QR code for checking in and taking attendance at events for pre-registered parents.
Setting up QR code instructions
Setting up a Public Kiosk QR code means no laptops or tablets are required to register people's attendance. If parents have not yet pre-registered - you simply get parents to scan and register on their phones.
Step 1. Go to the event and make sure the checkbox to allow Public Kiosk forms is ticked and save the event.
Step 2. Click back into "edit" mode for the event and scroll down to the bottom of the event page until you see the QR code.
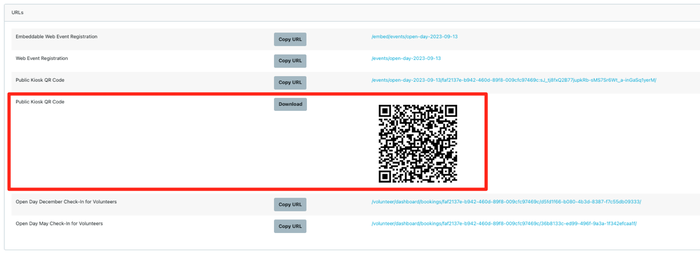
Step 3. Download, print and display the QR code at the Event Registration desk with a message to scan if parents have not yet registered.
(Example of poster to create)

NOTE: Those that use the Public Kiosk link to register on the fly, will already be checked in on submit so you don't need to do the check-in process again.
How to activate the QR code
To activate this self-check-in QR code feature, please go to the event and tick the 'Allow Public Kiosk Check-In' box. You need to first check 'Allow Public Kiosk form submissions' to then 'Allow for Public Kiosk Check-in' as an additional option. If you leave check-in unchecked, everyone who scans the QR Code will be forced to complete the form.
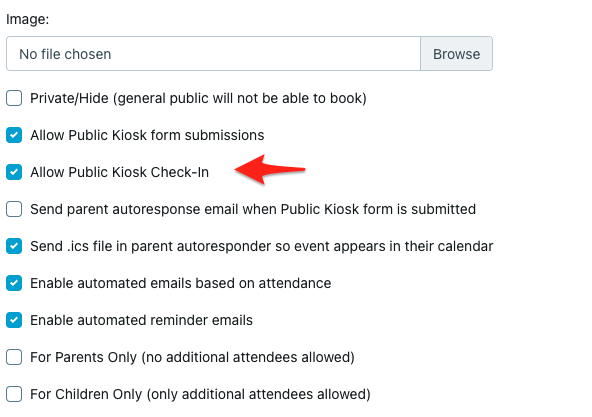
- Allow Public Kiosk form submissions - if this is enabled - the public kiosk link will work - irrespective of the date/time. This is important if you want to close pre-registrations off on the advertised web form but then keep Kiosk registrations open during an event - used typically for walk-ins for Open Day.
- Allow Public Kiosk Checkin - if this is enabled - allows parents to register their attendance. (See details under next section)
- Send parent autoresponse email when Public Kiosk form is submitted - this tells the system to send the autoresponse email or not if you are using the Kiosk form. It is normally turned off because parents are usually on-site already so they don't need to get the directions or details emailed to them prior.
These features will complement the Volunteer Dashboard that allows you use a phone or tablet to also check attendees in.
Please note that when self check in is used, all guests against the booking will be checked in. If you want to individually mark attendees and write notes etc, you should use the Volunteer Dashboard.
What is the self-check-in feature
Parents can now check themselves into an event using a QR code. Every event has its own QR code and registration link.
After scanning the QR code, the parent is asked to choose whether he or she has preregistered for this event or not. Two buttons are presented.

If the parent chooses "I need to register" they will be redirected to the standard booking page and on completion will be automatically checked in.
If the parent chooses 'I have pre-registered' they will be redirected to a page that asks for their email and session (as families can be booked into different and/or multiple sessions against an event). If there is only one session against the event, the parent will not be asked to select a session.

If the email (and session if applicable) is correct the parents will be checked in and a thank you message will appear.
If the email cannot be found, they will get an error message and be asked to try a different email address or to register to the event.