Follow this guide if you have received your EnrolHQ user account and want to get the Online Enrolment Form up and running for your school in 1 hour.
Make Sure Your School's Basic Information is in Place
Please read the step by step instructions here:
If you are copy/pasting content from a PDF, Word or similar document, make sure to clean paste data into your forms: Ctrl+Shift+V
Form Fields
EnrolHQ provides the ability for you to turn on and off form fields (questions), set the fields as mandatory, in some cases re-label the field, and also display help text against the field to help guide the parents. To do this you need to go to Settings > Form Fields
Go into each question and enable/disable the questions you wish to have.

- Choose to enable or disable the section in the form.
- Is the field Enabled for use?
- Is the field a Mandatory field?
- All sections can be expanded to view the series of questions relating to that section.
To edit all other fields, we recommend you open up the Application Form found on https://yourschooldomain.com/student/enrolment in a new tab so you can test your updates as you make them inside Settings > Form Fields.
Often you'll want to add some custom questions for students to fill in. You can do this by adding multiple fields under the Questionnaire section and enabling them for your form.
See also Form Fields
Parent Signature Settings
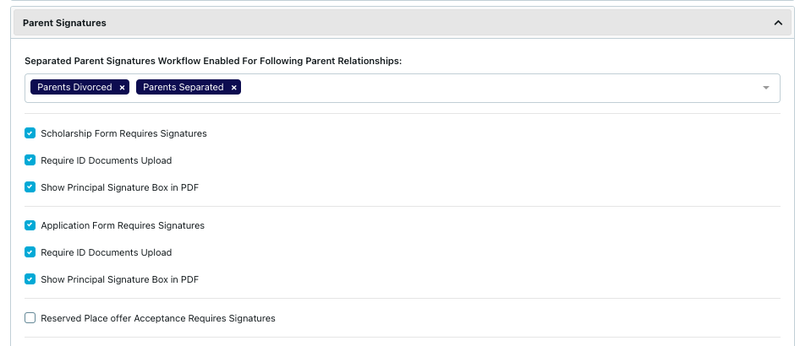
Go to Settings > School Details > Parent Signatures
- Tick "Enrolment Application Form Requires Signatures" - this will provide signature boxes for parents to sign with their finger on a touch device or use the touchpad on laptop.
- Select which parent relationships are allowed to do a split signature workflow by adding options to "Separated Parent Signatures Workflow Enabled For Following Parent Relationships". Split signatures allow the person filling out the form to tick a box that says Parent/Carer 2 is not available to sign. The school may contact Parent/Carer 2 by other means and ask them to sign later.
- If you want to collect Parent IDs at this point then you may tick the "Require ID Image Upload"
Customisation
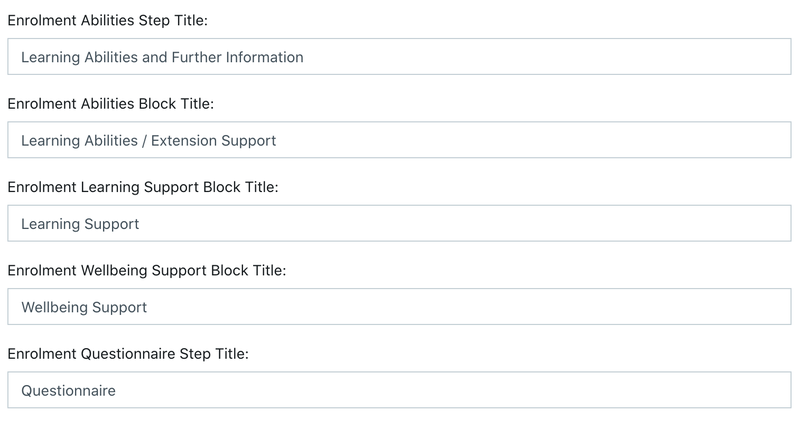
To edit the Application Form step labels, you can do so inside the customisation page by going to Settings > Customisation > Enrolment Application and Expression of Interest forms. Remember to save after making the changes.
To edit the content that shows on the start page of the Application/Enrolment Form, go to Custom Forms Stubs

Select the edit button

Each Stub can be configured for each campus (if you have requirements including different Images and Logo's they can be added here)
Enquiry Form - Name of the Form Stub you are looking at.
Campus Logo - Add an additional one if different from default logo.
Campus Header Image - Add an additional one if you want to use a different image based on the activity or the campus.
Introductory HTML - Information displayed above the login for the form
After Submission - this is the response or redirect to a URL
Add horizontal coloured strip across the top of the image to showcase logo
Show heading in header overlay
These are options for different looks for each type of form
Add Campus Setting - add an additional set of all the above for separate Campuses
Terms and Conditions
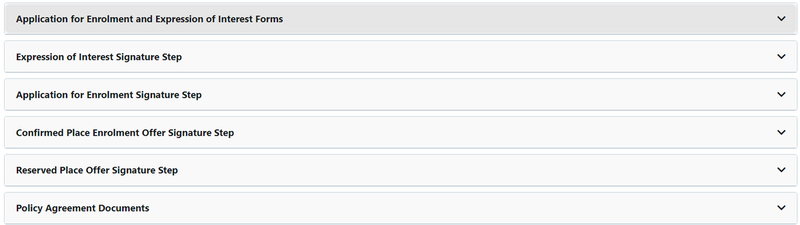
- Settings > Customisation > Application for Enrolment and Expression of Interest Signature Step.
There are the Terms and Conditions that a parent will be agreeing to as they submit an Enrolment Application, Expression of Interest or Scholarship form. There are also conditions included when a place is offered.
These names can change according to the organisation's preference. The steps should be completed for Application and either Expression of Interest or Scholarship, depending on the organisation's use of EnrolHQ.
There are a number of separate sections that you can choose to use. Default text has been added as a guide for setting up this content. There are also options for specific conditions where a parent must use a check box. Please ensure all changes are saved.
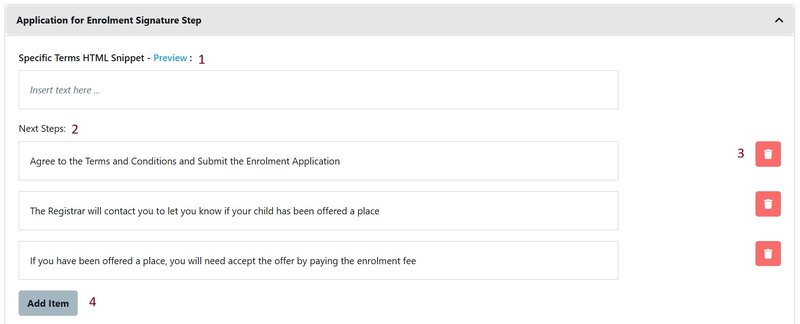
- Add specific terms for the parent to agree. You can use the Preview function to view the signature step after making changes.
- We have added some example steps here that can be amended.
- Delete any steps that are not required
- Add more steps as required
Remember to Save
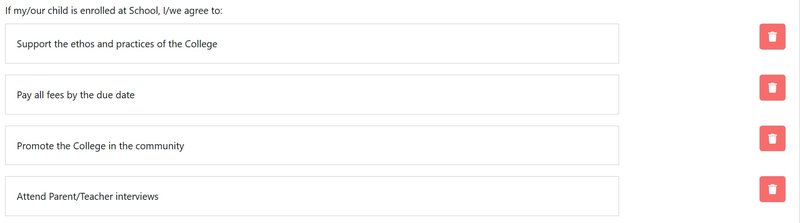
The next section allows you to include conditions that are expected of the child if they are enrolled.

- Click inside the box and amend the text
- Delete what is not required
You can amend, add and delete additional terms as above for what is expected of the parent.
Add, amend or delete the Enrolment Form or Expression of Interest Checkboxes for parents to tick acknowledgement before they submit the form. You can add links to documents on your school's website.
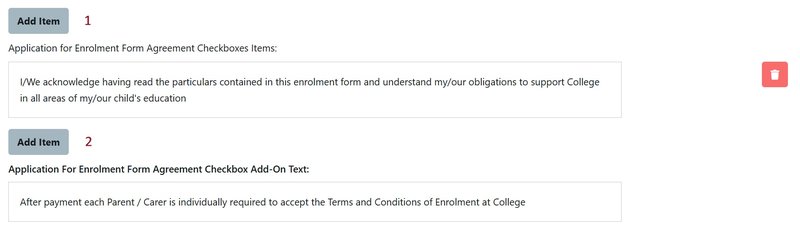
- Amend or add Agreement Checkbox Items
- Amend or add Agreement Checkbox Add-On Text
These steps should be completed for Application and either Expression of Interest or Scholarship, depending on the organisation's use of EnrolHQ.
- Settings > Customisation > Policy Agreement Documents
Policy Agreement Documents must be included. They must be added (drag and drop) and can be edited or replaced when policies change. These documents will be attached to the Application or Offer as elected by your school.

- Use the Preview Functions to review the agreement step of your form
- Delete any obsolete policy documents
- Add a new policy document by typing in the name
- Add the document to open more publishing options
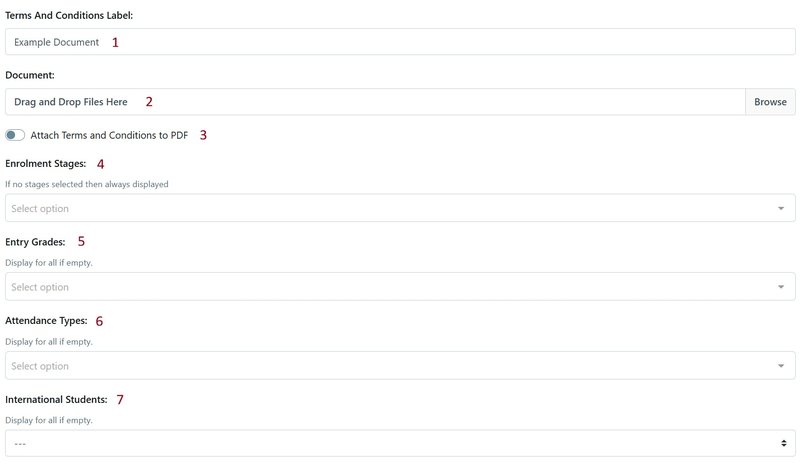
- The name you gave your new policy document in step 3 above
- Drag and drop your policy document or Browse to locate it from your folders
- Check Attach Terms and Conditions to PDF if you wish the document to be a part of the document the parent is agreeing to
- Choose which Stages you want the document to be included
- Some schools will have different policy documents for different grades. If left empty, the document will be included for all grades
- If your document relates to Boarders or other specific Attendance Types, you can elect that option
- As above, for International Students
Email Templates
Go to Email Settings > Templates > Enrolment
Navigate to the Email Templates and update each template as it applies to your organisation. Default templates are provided with only four required to be checked when setting up your Application form.
Enrolment Invite Parent
This is used if you invite people to enrol. If you have an open Enrolment Application on your website, you can ignore this template.
Enrolment Form Submitted Parent
This is the system automated reply that is sent to the parent on submission of the Application.
Enrolment Form Submitted Staff
This is the notification that goes to your staff on submission of the Application.
Enrolment Form Request Non-User Parent Signature
This is used for split parent signatures for separated or divorced families.
Note: The other Email Templates under Enrolment will need to be reviewed prior to sending offers, requesting more documents or declining an applicant.
Enrolment Workflow
- Settings > School Details > Enrolment Application Workflow
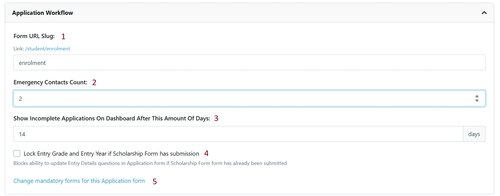
- This is the URL name of your enrolment form
- Specify the number of Emergency Contacts allowed
- Specify the number of days after which an incomplete application will show on the Staff Dashboard to allow follow up
- You may choose to lock the entry grade and if an expression of interest/scholarship form has already been submitted
- Click on Change mandatory forms for this Application Form to take you directly to the settings enrolment application Custom Form settings
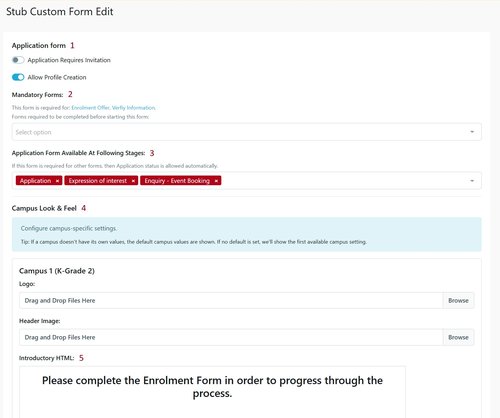
- If your application is available only by invitation, turn on the invitation function. Your application should always Allow Profile Creation
- Link here to other Custom Forms you require to be completed before a parent can start this form
- Select the Stages during which the application will be available for completion, for example Enquiry, Event Booking, Application
- If you have multiple campuses you may choose a logo or image/s specific to the campus you are using the form with. Usually the application is left to pick up images from the main Campuses settings
- Create an introduction to help your parents understand what documents will be required to be uploaded, how long the form is expected to take and other important information
- Settings > School Details > Enrolment Offer Workflow
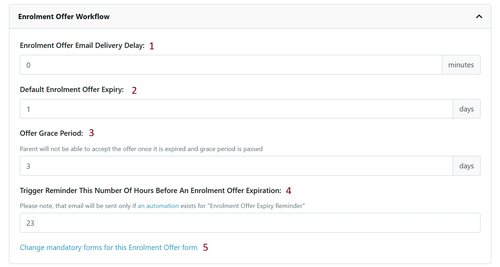
- Enrolment Offer Email Delivery Delay - change this to 0 minutes while testing
- Add the Default Offer Expiry period
- Set a Offer Grace Period that allows parents to accept their offer for a short period after the expiry if allowed
- Trigger Reminder - set the number of hours that a reminder email will be sent to parents
- Click on Change mandatory forms for this Enrolment Offer form to add other Custom Forms you require to be completed before the enrolment offer is accepted, for example ACARA Data Collection Form