Create a Custom Template
- Email Settings > Templates > Custom > Add Staff Custom Template
Copy and paste the following directly into the template
Dear Enrolments Team,
A new form has been submitted on behalf of {{ profile.first_name }} {{ profile.last_name }}.
The PDF form submission is attached to this email.
This is automated email message from EnrolHQ.
You can send this notification to multiple staff by hitting ‘Enter’ after entering each email address.
If the email is to go to a different email address make sure you specify the address by opening the "Show Advanced Settings" and add the alternate email address to "Staff To Email" - make sure you save the email address before you save the template.
Create an Automation
To read how to create an automated email please click here: Create Automated Emails
- Automations > Add
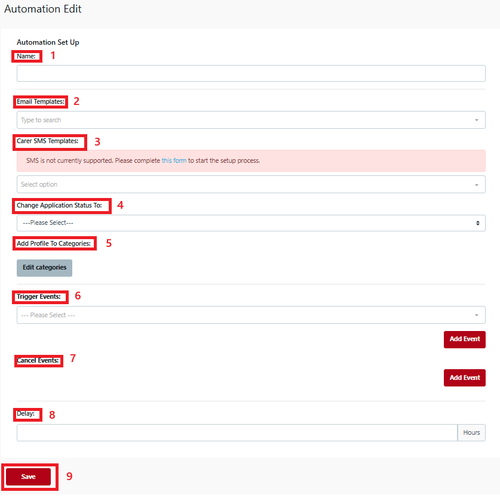
- Name - a name like ‘Custom form for action/review (Staff)’ makes it easier to identify and is internal
- Email Template - Select your template from the ‘Custom Template’ dropdown so the email goes to staff
- Carer SMS template - not applicable
- Change Application Status To - select the Enrolment Journey Stage this Automation will move the student profile to (e.g. if Pre-interview form is received - change stage to Interview)
- Add to Student Profile Category - you can add settings to the Student Profile Category via the Automation process
- Trigger Event - an example could be 'Application Submitted/Paid' or 'Interview Completed'
- Cancel Event - to be used for which trigger you don't want the automation to work
- Delay - Set the number of hours for when it should be sent.
- Save
Choose Automation Recipients allows you to select specific groups based on the options shown (optional)
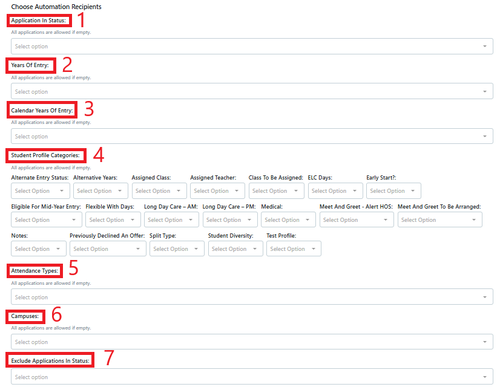
In an automation all of these selections are optional
- Application in Status
- Years Of Entry
- Calendar Years of Entry
- Student Profile Categories
- Attendance Types
- Campuses
- Exclude Application in Status
- Save
The automation timing only works when the trigger has not passed.
If the automation was not in place then it will not send the notification and you will have to send/complete the instructions manually.